One of the things I love most about reviewing music technology for these pages is stumbling across innovative ideas hanging out at the fringes, kicking the tires, and discovering something really cool in the process.
So it was with the discovery of a neat little piece of software from a little company in the big city. That city is Toronto, the little company is called WaveDNA, and that neat little piece of software? Well, that’s called Liquid Rhythm.
A young company—just four years old—WaveDNA has decided to tackle one of the fundamental elements of any EDM music project: beat construction.
Of course, there are many schools of thought and many approaches to laying down rhythms. Drum machines (whether physical or their virtual, digital counterparts). Loops of pre-constructed samples and arrangements. Samples you arrange yourself through whatever means. Some are pre-made, some are programmed, and among those programmed, the programming itself may be MIDI or something else. The array of options is a bit mind-boggling.
As a longtime Ableton Live user, my usual workflow is using a Live Drum Rack, coupled with an off-the-shelf rhythm sample library. I choose the desired sounds from the library, dropping them into the Drum Rack, and then I set about programming the rhythms by hand with MIDI, drawing them out manually, adjusting velocity and timing, and perhaps adding effects or other tweaks on a sound-by-sound basis. It’s satisfying work, but occasionally a bit mind-numbing in a creative sense.
I’ve long thought there has to be some better way that’s not as restrictive as, say, using pre-made loops; something that lets me use whatever drum samples or libraries I might want; something that lets me tinker, but that provides for greater creative expression. I think I found it in Liquid Rhythm.
The Basics: To set the stage, Liquid Rhythm is a standalone application—available for both Windows and Mac—that you can view as a sort of rhythm construction kit. Used in this manner, you can think of it as a MIDI programmer in some respects, but while it has its standalone mode, most users are likely to drop it into their preferred DAW as a plug-in, which can be accomplished in VST, AU, or RTAS flavors.
While it works with any leading DAW, the product’s Ableton Live-specific capabilities were of particular interest to me as an Ableton user; this review thus comes from that point-of-view.
In any event, Liquid Rhythm is essentially a drum machine—albeit a very unique and powerful one. It comes with its own library of sounds, arranged into kits, which can be customized as desired, including the ability to bring in samples you may already have in your library. And for Ableton Live users, the company provides “Liquid Clips,” an innovative bridge that allows tighter Ableton integration than the plug-in route provides. Liquid Clips takes advantage of the Max for Live engine that’s now provided with most versions of Ableton Live 9.
When using Liquid Clips, the underlying drum sounds are handled by Ableton Live; whatever drum rack you may have loaded into a track—whether using Ableton library sounds, or perhaps your own—is what Liquid Rhythm is using and controlling, so its focus shifts to becoming a very sophisticated drum programming tool in this mode.
It is this broad set of capabilities—use it standalone, use it as a plug-in, use its Liquid Clips mode in Ableton Live—that makes the product a bit daunting at first for an Ableton user. Which approach is right? Which is best? The answers are largely left for you to discover on your own.
In any event, when working in Session View, you get the same functionality you’d enjoy with any other Session View approach; it’s a quick way both to prototype musical concepts (and the stuff you come-up with can then be migrated to the conventional Arrangement View for further manipulation), as well as for live performance using a sort of “remix-on-the-fly” approach.
In more recent versions, the product also works in Arrangement View, although due to limitations in the Max for Live system, the integration is not as tight as perhaps might be ideal; while Liquid Rhythm can read the clip, it cannot currently (as of this writing, anyway) determine where on the timeline the clip rests. Regardless, the fact the WaveDNA added this support midway during my review process was a welcome addition given that I rarely use Session View these days.
How It Works: Overall, Liquid Rhythm works great—and I’ll give more details on that ahead. But I have to say that it’s nice to see WaveDNA adopting a program of continuous improvement for the product, adding entirely new functionality while working to squash bugs quickly. It’s had the side effect of making this review a little tough to get completed; over the course of the last few months while playing with the software for this review, the company has released several updates, adding significant new features along the way.
As I write this, its next major update is imminent, so I’ll note that as I put this review goes to print, the Liquid Rhythm is at version 1.4.3; by the time you read this, no doubt it will have been upgraded again.
If I had any complaint about Liquid Rhythm, it’s that it has a relatively steep learning curve. There are so many different ways to use the product, and we don’t have space to delve into much depth on any one of them. As I already said, you can use it as a plug-in, or a Max instrument. You can use it in Session View or Arrangement View. You can use it standalone. It offers interesting support for Ableton’s Push controller. You can sequence with its BeatBuilder, you can use its BeatWeaver rhythm synthesizer, you can view maps of your rhythm patterns, and if that’s not enough, you can directly tweak and edit and modify the output six ways from Sunday.
Of course, that’s consistent with “the Ableton way,” where there quite often are multiple paths to any specific desired outcome. The downside, of course, is that it’s well-advised to do sufficient reading of the excellent, accompanying documentation before digging in. And kudos to WaveDNA on that front, as well as for providing a healthy series of videos that walk users through the product and its myriad options; it makes the ramp-up time more manageable.
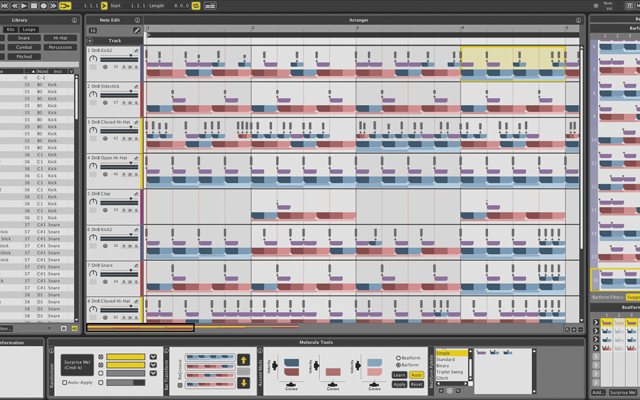
The logical starting point is with the understanding of the product’s unique representation of rhythm MIDI notes and phrases, which the company calls a “Music Molecule.” A mixture of note events, plus depictions of what the company calls BeatForms and BarForms, it’s the visual representation of these that’s used throughout the user interface. It’s easy to understand and almost familiar to any digital musician when you see it, but the terminology is part of the challenge with learning the product—there are a lot of similar terms sprinkled around.
At its simplest, Liquid Rhythm lets you build beats quickly using bar-long rhythm patterns from a broad array of choices. These can be adjusted and tweaked endlessly, with simple ways to make the beats sound more human. The interface is very much geared to experimentation and discovery, and it’s easy to get lost for hours just tinkering. Some of the features, such as the GrooveMover, are designed to boost that very type of experimentation.
If you simply sit down to start working with the product in its default set-up (perhaps easiest to do when running it standalone, outside of a DAW), you’re presented with an easy-to-understand, drag-and-drop style interface. Start by picking a kit—there are included kits for popular EDM styles, including house, pop, dubstep, and others. Once loaded, click play, looping by default in the first bar of the arranger. There, you’ll see tracks pre-filled for kicks, snares, hats, etc. You’ll start hearing sounds when you drag patterns from the barform list on the right into the arranger.
The barforms are instrument-smart, meaning that the patterns you see offered up are specific to the percussion instrument, so you see kick patterns for kicks, open hi-hat patterns for open hi-hats, and so on. Just click inside the arranger to highlight a single bar for a single instrument (e.g., a kick drum); the list of barforms adjusts automatically to show relevant patterns.
Once dropped into place, the product’s myriad other tools are available for tweaking. Use the Beatform Sequencer to change up patterns, or the Molecule Tools to tweak individual notes, among others. Or simply browse the modes in the barform list to try other options, perhaps going outside the instrument-specific suggestions if you wish.
Many of the software’s capabilities are accessed under the Molecule Tools, including randomization features, the aforementioned GrooveMover (a tool to adjust accent patterns), various manual adjustment options for accents, and much more.
There are numerous cool widgets provided for tinkering, not to mention innovative tools like BeatForm and BarForm Maps—they’re circular, and suggest familiar devices such as the Camelot scale (for harmonic-mixing DJs) or the classic Circle of Fifths familiar to many musicians. But the purpose, instead, is to rapidly jump to patterns with the timings and complexities you might have in mind for your track. They, too, are instrument-smart, highlighting the most relevant options for the particular percussion instrument you’ve selected in the arranger.
Conclusions: With the feature set rounded out by things such as flexible MIDI mapping, the inclusion of a comprehensive MIDI library, and an instrument editor for better leveraging one’s own sample libraries to build beats, you might find yourself getting lost—as I did—for hours at a time in front of your DAW, playing endlessly with options.
The product is available in two flavors: an “intro” version for $49, and the full-on feature set version for $129. The extra spend delivers the Ableton Push integration scripting, along with the BeatWeaver rhythm synth, and features like BeatForm Tumbler and BeatForm Shifter that bring additional creative tweaking capabilities to the table—among others. Either version is bound to rapidly become your go-to solution for beat construction—as it has for me.
visit www.wavedna.com for more information


